

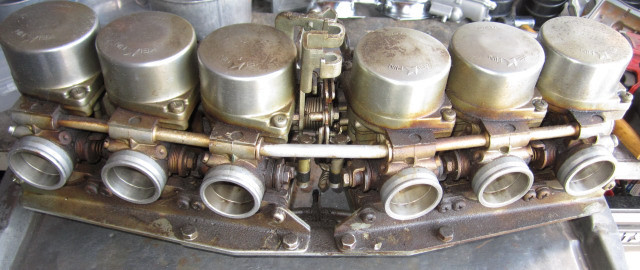
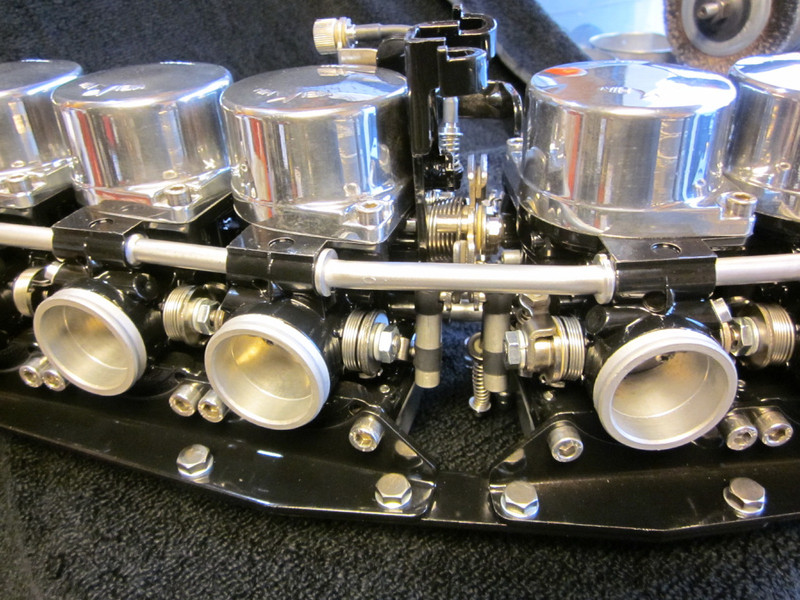
The CBX carburetor is a perfect example of industrial art at its highest. Truly, whoever designed these things was a genius of the first order. However, they're challenging to service even when you do it every day. There are interdependent mechanisms that have to work in tandem to achieve a good result and it almost never happens by chance. I like to say that CBX carbs are as close to rocket science as you can get. And I'm only half-joking.


Although I service all makes and models of carburetors, the CBX is by far the mainstay of my business. At any given time I've got more CBX sets than the others combined. Naturally I have a healthy backlog, which is generally around 10-12 weeks from the time they arrive here before they're ready to ship back to you.


What I WON'T do is tease you with one price and then hit you with a bunch of add-ons. If I find a frozen pilot needle or a boogered up main jet nozzle I'll take care of it without you ever knowing. Likewise for the occasional stripped screw or broken float post.


Ditto for a cracked overflow standpipe, which are more common than you'd think. Some guys will charge for repair but the truth is that it takes about a minute to solder in a new one. I keep them within an arm's reach so we do it and move on.

I have two levels of service. First is what we call a "clean-and-kit service" where we do everything that all jobs get, right down to new felt throttle shaft seals, but we skip the show finish. If you're happy with how they look overall we can do this for $1450.


The full service costs $1750 plus return shipping in new, secure packaging. WE SHIP INTERNATIONALLY. For a shipping quote send me an email.


Obviously if I find a serious problem it'll result in extra charges but I'll let you know right away. Bottom line is I don't sweat the little stuff.


To get the process started, download the Service Request PDF and either call or email with your phone number and I'll call you. I'd never spend this kind of money without first talking to the guy I'm trusting with my carbs, and I expect you feel the same. Plus, I love the occasional stump-the-expert session.
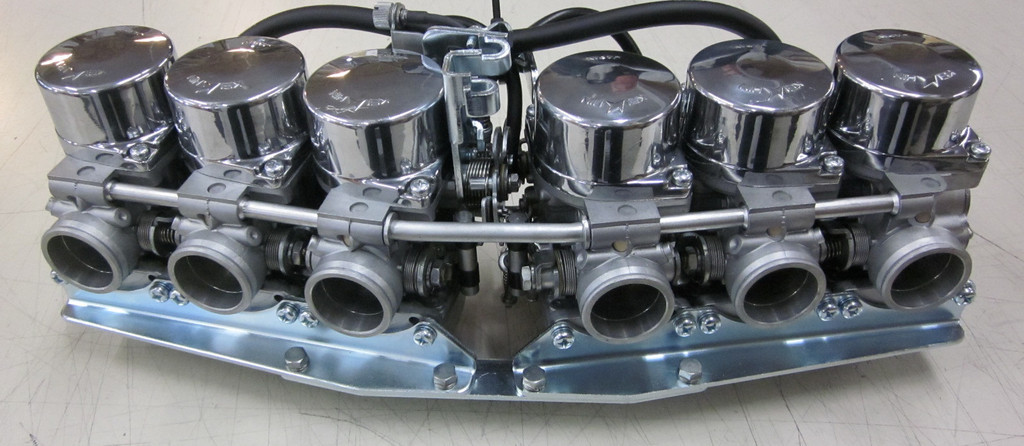
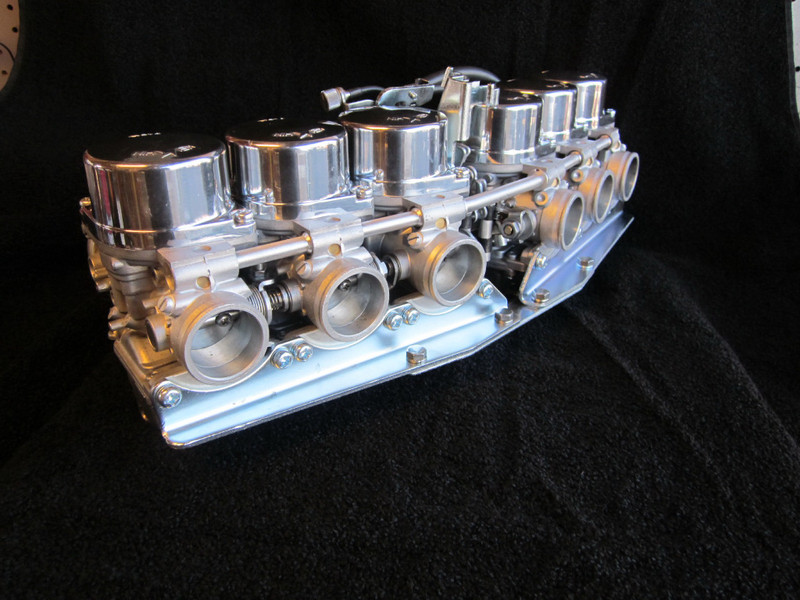
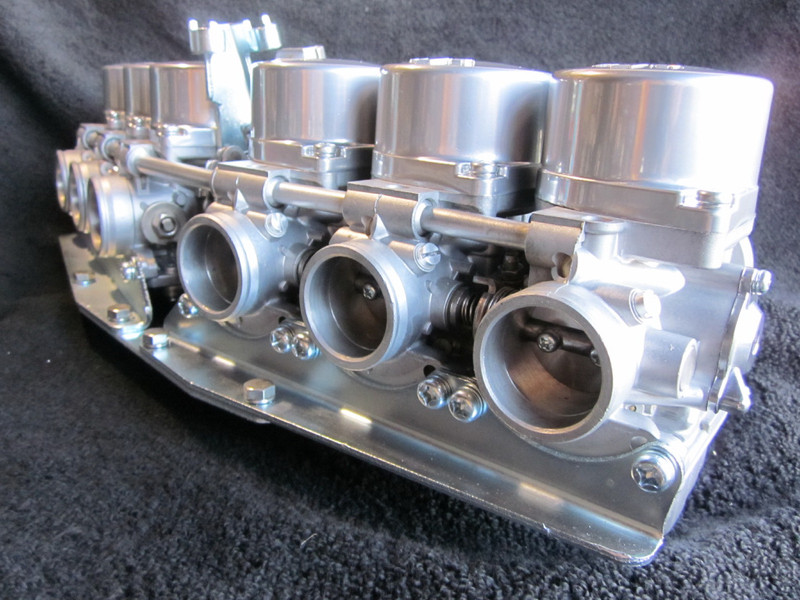
What I'm aiming for is a carburetor set that looks like it's never been installed. In fact I owe that description to a customer who remarked that he wanted to put his carbs on the mantel instead of the bike.


HOWEVER


What goes into your carburetors is more important than how they look.


Each rebuild includes:
-
New Viton o-rings for fuel, air and accelerator pump circuits. -
New Viton passage plugs -
Cleaning/replacement as needed of all jets, emulsion tubes, and pilot needles. -
Normalization of jets and control mechanisms (see below) -
New float needles, seats as needed -
New Viton bowl gaskets -
Japanese-made air cut-off and accelerator pump diaphragms -
Brand new proprietary center air tees that will never fail.
My fasteners are Japanese-made (JIS) and come from the aircraft industry so they're mil-spec. They're indistinguishable from ones used on at the factory, whereas US-made (SAE) screws have a larger head. You wouldn't know this sort of hair-splitting gobbledygook unless you spent the time researching, but if you saw them side by side you'd see the difference immediately. We're just picky that way when it comes to authenticity.


If you have any questions concerning your project, ask away.  I'm focused on carbs now but I've restored/rebuilt all of the inline and V4 models and I know a trick or two that you may find useful. Advice is free and plentiful and if I can't answer your question I'll find someone who can.
"Normalization." I invented the term because I can't think of another one to describe what I do and it fits.
Basically it just means that I put things right.
None of this is to suggest that you can't service your own carbs or that I'm the only person in the world who can do them correctly. It's just that there are so many variables to consider that at a certain point you begin to rely on sheer luck to have them come out right the first time. The following are merely some of the reasons I've discovered as to why any given job can go south.
1) Fuel Jets. Jets are manufactured in large lots on different machines with different mills that wear at different rates. That's a lot of variables. One that's a ten thousandth of a millimeter off may be well within tolerance but it's not absolutely identical to its couterparts in the other carbs. I acquired mills in every jet size, plus some in-betweeners, and I use them to make sure that every jet is exactly the same. We can go from a size 35 slow jet to a 35.5 if need be, or any other imaginable fractional size--that's how precise my mills are. They weren't cheap but it was an investment well made.
Once I started doing this I was surprised at the variance I found, mostly in the slow jets---where it's vital to be absolutely precise. It's not like I hog great chunks of metal out of them, more like barely visible glitter, but still...different is different.
If you're not intesteted in the tech you can scroll down but I took the time to delve into the subject because this is what we do.
JET TECH
I used to wonder about jets--how they work in tandem and how one arrived at a proper size for a given setup, etc. With the numbers of carburetors we service over a year's time I see a lot of mods that were done by some previous owner.
When I find out-of-range jets the first thing I'll do is call and ask my customer if he knows of anything that would warrant the change: aftermarket exhausts, pod air cleaners and the like, but perhaps your bike was simply ditched years ago for an unknown reason. Until now, perhaps.
You develop a feel for these things over time but it's based on observation and doesn't explain what's actually going on. So, I asked an engineer friend if he knew anything about fluid dymanics. He's an aircraft engine designer so I figured he was the one to listen to.
I don't understand some of the calcuations he used but I was more interested in general stuff anyway. That didn't stop him so I listened hard and nodded a lot. The basics got through well enough I think.
Here's what he came up with:
Take, for example, a 122 main jet. Its flow rate is a function of vacuum and the size (and to a lesser extent the shape) of the orifice.
Let's say that we increase the size of our 122 jet by .003mm to a size 125. Assuming the same vacuum, our 4% increase in the size of the orifice yields a 7-9% increase in the flow rate.
Now let's take a #35 slow air jet and increase it by the same amount, .003mm, to a #38. This gives us a 7.9% larger orifice with 18-20% more flow!
I enlarge slow jets on CBX and DOHC carbs to 38 on the understanding that they were designed lean to meet EPA regulations. Bumping them up a size translates to cooler engine temps and improved throttle response with negligible hit on fuel economy.
One of the more common goof-ups I see is when someone who called himself an expert jammed a piece of stiff wire through the slow jets to "clear and properly size" them. (Guitar strings are a favorite among the jet-wrecker set.) Not only are the orifices no longer perfectly circular but our "guru" poked whatever might have been clogging them INTO the carb bodies.
My dad used to say, "A short cut is a quicker path to ruin." That about sums it up as far as my philosophy.
When I'm done with the normalization process the jets are all absolutely uniform. I've had folks remark that clutch and cam chain noises are gone now that they've installed their new carbs, which is actually predictable if you stop and think for a moment about what we've done: When the individual carburetors are delivering exactly the same amount of uniformly atomized fuel, it only stands to reason that the crankshaft will spin more smoothly. And there go noises associated with vibration.
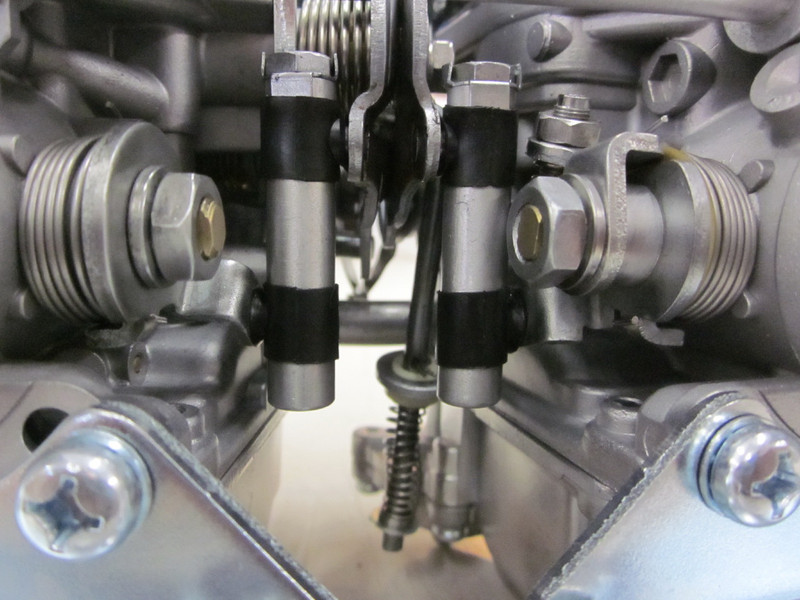
2) Choke. "Lazy choke syndrome" is a myth perpetuated by those who would have you believe in voodoo over actual engineering. If the choke shafts don't rotate freely you need to sort it out at the source. They bend easily if mishandled by a knuckle dragger; plus, when you're assembling a set the geometry is going to be a tiny bit different than when you started.
When I've got a three-carb "brick" linked up I set the stabilizer screws finger tight and fit the choke rod without the spring. If it binds, out it comes for adjustment until I've got it perfect. Only then do the springs and butterflies go on. Then I torque everything down whilst blipping them continually to make sure they remain completely free-rotating.
I've built too many CBX carbs to count and I've never found an otherwise undamaged relief spring that didn't perform as new. Oh they can occasionally require some coaxing all right, but that's what you're paying me to do instead of applying a quick fix that doesn't address the underlying issue. I've NEVER had a complaint that chokes weren't working perfectly attributable to error on my end.
3) Throttle plates drift out of alignment over time such that under normal spring tension they don't close fully on their own. In fact I virtually never encounter a set where all of them work perfectly, and it can get so bad that you can only get one closed by force.
I've heard folks complain that the set they just rebuilt themselves won't idle down all the way and adjusting the synch screws either does nothing or only makes it worse. Well, obviously, a throttle is binding. Tragically the author of the little how-to pamphlet omitted this most important procedure.
So what we do is relax the screws just a tad, which doesn't upset the staking in the slightest (a screw can't work its way out). If done correctly the butterflies will right themselves with little or no coaxing. There's some free play designed into them for this very reason so I'm merely making use of what the factory assembler did way back when.
The catch is that the bodies must be free of each other, which is to say you've got to do this before you start assembling. If they're linked up, the synch mechanisms will prevent an accurate result and you'll amost certainly make it worse.
4) Internal threads will corrode to some degree so I get into the threaded bores and "chase" the threads, which clears the oxidized aluminum and any tiny bits of thread that might have become misaligned during removal. I say "will corrode" instead of "might" because I've never seen one where at least a trace of material didn't come out; and some are so mucked up that we get a little pile of duff that appears as a mix of fine gray powder and teensy particles of bright metal.
Imagine that we install a main jet nozzle, which resides deep inside the carburetor and shares a very small air passage with the slow and pilot circuits, without chasing the threads. Any crud that we'd ordinarily have removed will stay inside the carburetor body. Forever.
One other thing that's very hard to diagnose is when the threads in the needle jet tower get "stretched" by repeated removing and retightening of the emulsion tube. This phenomenon is "the usual" for the 70's inline fours but we've seen it in later carbs as well, although less frequently.
The emulsion tube is designed to be air- and gas- tight both where it comes up against the needle guide and at the threads. Repeated "unscrewings" stresses the metal to the point where the tube will come up against the guide before it's fully engaged in the threads. It'll "feel" right but is in fact only snug at one of the sealing points. This leads to all sorts of strange symptoms because it's now able to pull fuel or air through the threads around the emulsion tube instead of through the jet. Ultrasound exacerbates this effect. (see below)
5) The accelerator pump. Simply changing it out often has little or no effect on performance. The #3 bowl has a pair of one-way valves and if they're not working in tandem you won't develop any pressure. Plus, the nozzles--the tiny brass protrusions on the choke side of each carb--need to be perfectly clear.
This is another of those areas where we rarely see a set where every one of them is perfect. The diaphragm wasn't designed to stand up to alcohol so we generally find that the pass-through hole from the bowl to the pump has puckered shut--sometimes so long ago that the bowls have fresh gas in them but the downstream valves and nozzles are clogged with ancient gas that's turned to lacquer. When that happens, installing a new diaphragm alone will do exactly nothing.
It's also vital to ensure that the output nozzles aren't just "good enough." They're designed to have a specific spray pattern. The problem here is that even a tiny bit of accumulated crud around the tiny outlet orifice upsets the pattern such that one carb body's output is different from its neighbors. Think of all the partially clogged spray paint nozzles you've cursed at over the years. The fix requires 1) knowing the exact size of the outlet orifice, and 2) designing a tool to restore it to perfection without enlarging or changing its shape.
A little known fact, even among "professional" carburetor builders (and I've asked), is that the brass outlet nozzles are in fact teensy check valves. In order to operate as intended, they've got to both properly direct outflow of fuel AND prevent backflow of air, else the diaphragm return spring will cause them to suck air back into the circuit and render it semi-functional.
Occasionally we have to drill out a check valve that's beyond repair but this is only in extreme cases and is therefore rare. That said, malfunctioning accelerator pump components are commonplace and if left alone, all the good intentions in the world aren't going to help.
6. Synchronization. The first thing to say is: beware of misinformation. There are those out there who have written on the subject and who are quite simply wrong. I have no idea why they promulgate superstition or make it overly complicated. Perhaps they want to sell you something.
My approach is rather different. One of the reasons I want to talk to prospective customers beforehand is that there are things I want to know before we strike a deal. I've learned from more than caller that the only thing wrong with their bikes was a flaky idle. I'll advise anyone thus afflicted to have the synch checked before plunging headlong into a perhaps unnecessary rebuild. It's not that I enjoy chasing jobs away but we're plenty busy without taking advantage of someone's lack of sound knowledge.
It's this simple: If your engine drops rapidly and smoothly from 5000 RPM to a stable idle, you needn't bother giving synchronization another thought.
Synchronization only affects idle and throttle-down behavior so aside from being annoying it won't result in actual damage.
The signs of poor synch are a slow or hesitant return to idle, or an idle that rises uncontrollably as the engine warms up. You may also notice that the engine won't wind down between gears.
Obviously this is assuming that there's no binding in the cables or throttle plates.
What's happening is that the throttle butterfiles aren't closing equally and are in a tug of war, hence psychotic idle behavior.
To synchronize on the bench I use a vac motor that'll suck a gopher right out of his burrow. The rest is simply following the proper sequence. It takes me around five minutes, most of that in untangling the tubes.
This is one of those things that we can get right 99 times out of a hundred, in fact I've been asked more than once how I get them so dead-on perfect, but there's always the odd set that needs fine-tuning. As close as I can get most of the time, I can't replicate real life dynamics. Even a set that's been run on one bike may not be synched properly for another.
This is owing to differences in valve clearances and compression and synchronizing adjusts each carb body to its cylinder.
A note about Ultrasound: It might be fine for my wife's jewelry but I don't use it and in fact I'm against the practice for several reasons.
For one, it only cleans surface grime off of things--and very well at that to be sure--but vibrating water doesn't circulate so by it's very definition it's not going to clear a blockage, especially when you consider how tiny some of the passages are. Maybe it can soften the crud that's causing a problem but the only way to do it right is the hard way: get in there with actual physical tools that will do the job without the risk damaging anything in the process.
This leads to my second complaint. I've seen perfectly good carbs destroyed when brass parts were left in place and the ultrasound solvent wasn't rinsed out. Even something as seemingly mild as simple green, a favorite amongst practitioners, is corrosive enough to etch both aluminum and brass when it remains trapped in an internal cavity. I spend a lot of time making sure that there's nothing inside those passages that can come loose later on, or remain behind to erode a connection that needs to be fuel or air tight. Why risk something that jeopardizes my hard work?
Ultrasound is perfectly safe when used properly, but what's the point? Ultimately, at least as far as carburetors are concerned, it's totally unneccessary--plus which you might be tempted to skip a crucial step believing that it's doing a job it's not actually doing.
So at best it's merely useless; at worst it's catastrophically destructive.
Depending on the condition of the metal, I use a combination of solvents and a proprietary mix of "stuff." Naturally I don't want to talk about it because I spent a lot of time developing my recipe but it's environmentally friendly, non-toxic, and it doesn't erode or modify the base metal. Walnut shells? Gimme a break.
All of the above being the case to some degree or other, the number one ingredient is time.
Here's Where You'll Find Us:
OldSchoolCarbs
1346 The Alameda Suite 7-80
San Jose CA 95126
Phone: 408-921-1735
Email: Jack@oldschoolcarbs.com
OSC Service Request.pdf
Adobe Acrobat document [66.0 KB]

If there's anything you need for your CBX, Bill is the one to call.

Digital Pizza is where you'll find Pete Rose's genius at work.
Click on the logo for a 100-Point restoration not only of a CBX but other Honda Inline 4's.